Showing posts with label DIY. Show all posts

Saturday, October 18, 2014

Tie Dye Coffee Filter DIY Wreath


I have a ton of coffee filters I bought over the Summer for the pure reason as they made me money as overage on a coupon at the Commissary. We have a reusable filter in our coffee pot (and if you don't I highly recommend one!). I looked at them the other day, and decided to use some dye we have from our handmade tie dyes on them. I had no idea what I was going to use them for, but hey not risking any money, why not?

Well, I found out what I would use them for, when I spotted a foam wreath form at Dollar Tree! Of course, I hopped on Pinterest to see just how I might go about this. I found so many tutorials that I was able to "wing it" in my own way!

For the first step, I decided to use some leftover ruffle yarn I had from a scarf project, and wrap it around the form.  I wasn't sure how the foam would hold up to constant use of my hot glue gun, so I wanted a barrier.

After that was secured, I tied a loop of the yarn, so I would be able to hang the wreath.

From there on all I did was fold the filters in quarters, pinch the bottoms, and fluff them up a bit to give an almost flower effect. I did a bunch at a time.

I then put a small dab of hot glue on the pinched end and pressed the filter onto the form. Put A LOT of them in there to give a full effect!

You can see here how it looked halfway through:
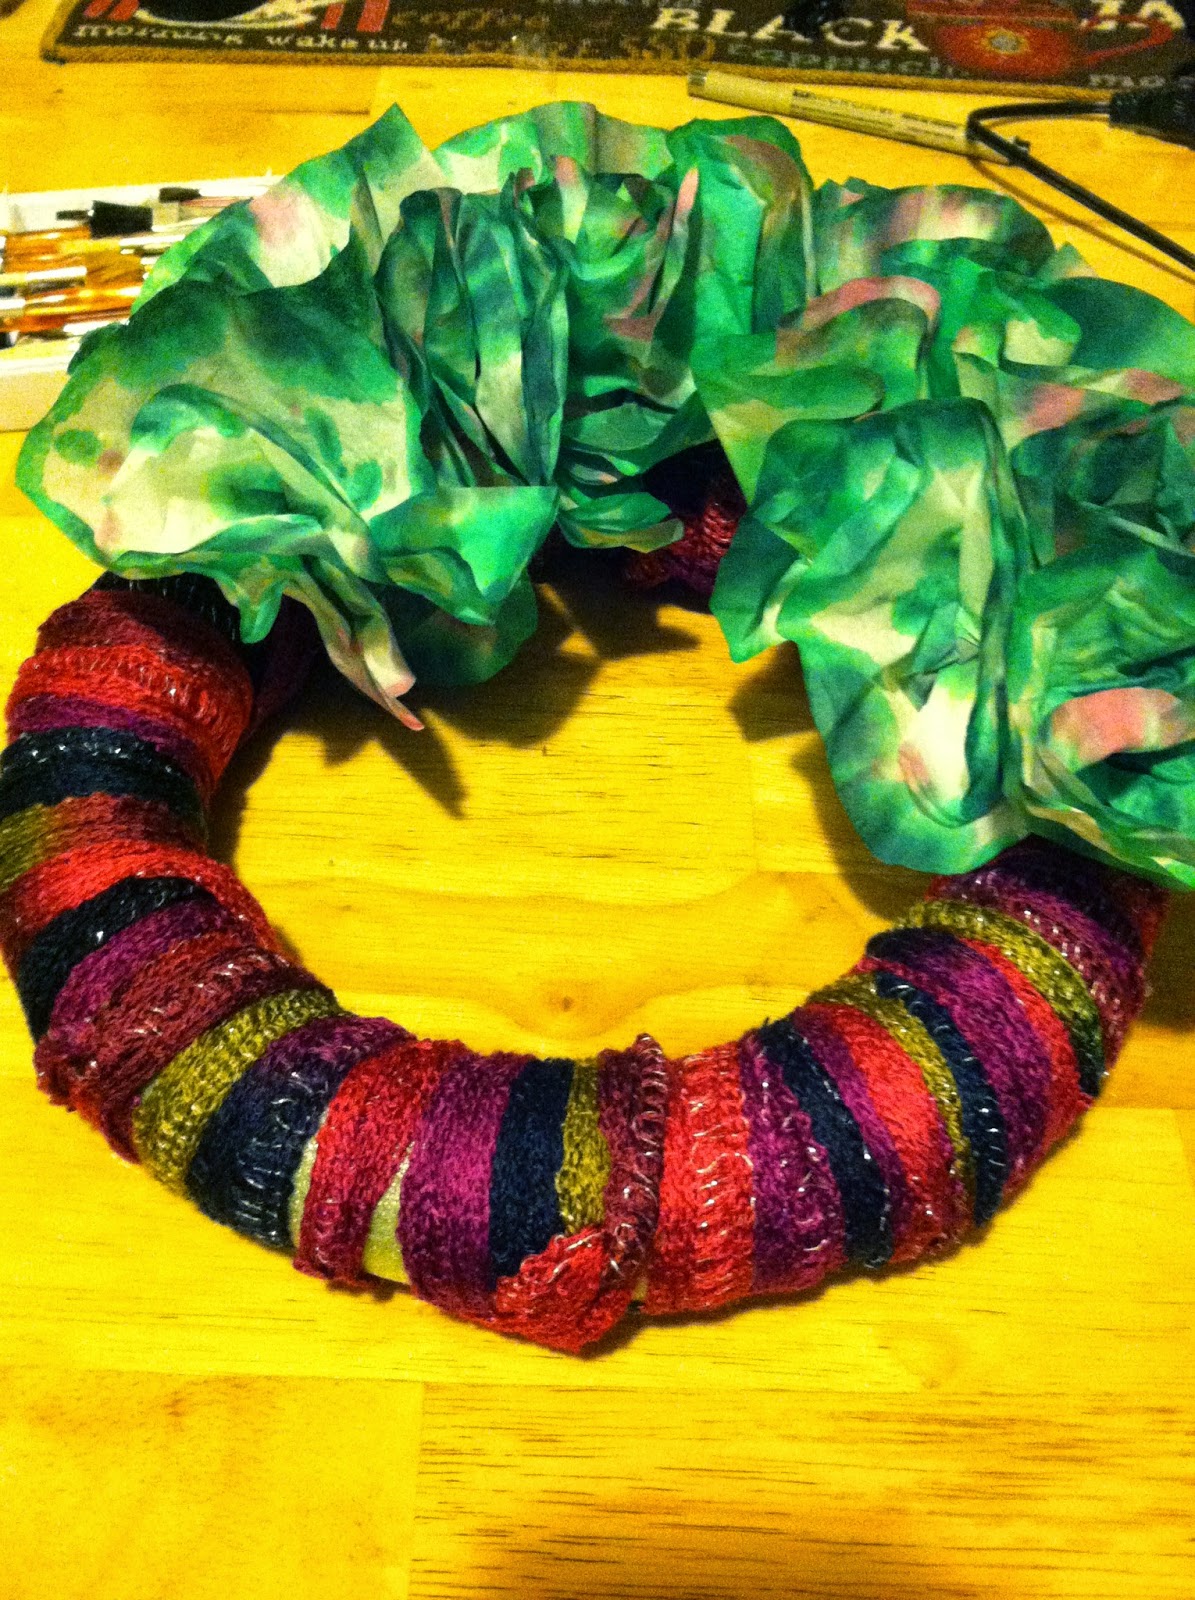


And the finished product:


This was such a fun project! And I was able to finish it (other than the drying time for the dye) in about 1 hour.

Friday, September 19, 2014

I Thought Pressure Canning Was Faster


As I sit here at 11:00 PM, I am still waiting for the chili I started preparing from scratch at 7 O'Cock to be done in my brand spanking new Pressure Canner! It took me a about an hour and a half to chop, dice, simmer, and all that other jazz. And then the canner.....

You have to heat it up, vent it for 10 minutes, put on the weight, wait for it to rock, regulate the temperature and THEN you get to start timing! In this instance AN HOUR AND A HALF! What? Yeah, you read that right.

I still have 35 minutes left! I am tired. I want to go to bed. Yeah, so I am not a wild and crazy thing up until all hours on a Friday, so what? You probably already figured that out by the fact that I am canning homemade chili on my Friday evening anyway.

My day started at 5:30AM. I walked the track before work and put in my full 8 hours. I went to Target after work.... and then THE CHILI....

I thought this thing worked faster than this! Should have done some major homework. I mean pressure "Cooking" is known for it's time saving qualities, right?

All I can say is this better be some damn fine chili! (OK I know it will be as I always make it this way, but you know what I mean).

I did manage to get some crafting in, so the whole night has not been devoted to the chili!

Monday, August 18, 2014

Tie Dying The Evening Away


As I mentioned in my last post, my friend and I are renting space at a craft fair.  Our primary focus will be tie dying.  Last week, after work, we spent a few hours getting some of our offerings prepared.

I love how these all came out! We have here 6 bandanas, 3 pair of socks, 2 heavy weight dish towels (these were my favorite!) and 11 T-Shirts. It's a good start and will be followed up with a few more sessions. The best part? Our bottom line is soooooo low!

The materials for dying were all leftovers from the company picnic. My manager let us keep packets and packets of dye, about 8 large bottles of already mixed dye, elastics, and gloves. So those materials were all free.

The dish towels were just .50 each on clearance! The T- Shirts averaged 1.27 each, the socks were .50 per pair on clearance, and the bandanas were .99 each!

So far, out investment for everything is under $25 and another $30 for the space.  That $30 will be donated to help NF Childhood Cancer.

Sunday, August 10, 2014

Planning For An Upcoming Craft Fair - First Time!


My friend and I are participating in a craft fair for the first time ever. I am super excited and a little worried. Excited to have the possibility to earn a few extra bucks doing what I love, creating stuff. And worried because, well it is my first time and I want to make sure my overhead does not exceed the sales.

We will be offering a variety of handcrafted items, with a focus of tie dyed items. They are an item that seems timeless and so much fun to make! My friend is amazing at this and I can certainly hold my own.  I will also be doing some smaller crocheted items, such as washcloths, coasters, and cup coozies.

We do not have a "business" so I do not feel that limiting my offerings by sticking to a "branding" attitude is needed here. I just want to spotlight the various things I love to create.

I have quite a few ideas and some time to work on them as the fair is a bit over a month away.  I was thinking of offering handmade gel air fresheners, sewn kitchen towels, and I may just leave it at that.

We have an 8'X8' booth with a table and I am bringing a clothing rack for the tie dye clothing.

Has anyone had experience with this? Any ideas?

Tuesday, April 15, 2014

But I Am Just A Receptionist! Planning A Company Outing


My current job is a receptionist for a very large company. At my location alone there are 450 people! There are over 30 locations across the country and I am the "default operator" for all of them. By that, I mean if you call ANY of our locations and choose zero on the phone tree, you will end up speaking to me.

You would think I would be much busier than I feel. But the truth is, I do have downtime (most days, anyway). When that happens, I generally reach out for a project. I am a part of the Human Resources team, but my "projects" do come from varying departments.

Two weeks ago, I was tasked with redeveloping and implementing the 10 bulletin boards around the building. It was a huge undertaking, especially since I get limited time away from my desk. I have finished the redevelopment part of that, and implementation will take place soon.

This week I have been handed the task of planning all aspects of my location's company outing this Summer! Whoa!!!! I have never taken on anything like this before, so I am both excited and a bit over my head (I think) on this. Choosing a venue would be a natural first step. But, nope! I have chosen a theme first. I want a 1960's hippie theme.

Let me explain.  My company was founded off the back of a truck in the 60's by, you guessed it - a hippie! So, I think it is fitting. It goes to many of the core, crunchy granola loving, principals that are still in place in our work force.

I am hoping that we can use a State Park as I think this would be perfect! Again, nature as a backdrop. What is better than that?

I have decided on a few things I would love to have for our party:


  • Company T Shirts that we can all Tie-Dye

  • Peace Sign Bean Bag toss

  • Face Painting station

  • Ring toss using mini daisy chains

  • BBQ and Vegetarian options for the food

  • Music from Woodstock and similar

  • Groovy Bingo using phrases of the era


If anyone has any other ideas for activities, that would be most helpful!
Also, any ideas on keeping a park setting "safe" in case it rains!!! Our outing would be in late July, early August.

Monday, April 7, 2014

I Made Yogurt- In A Crockpot- And It's Delicious


I have been dying to try my hand at making yogurt forever!  At first, I worried about the safety factor.  But, the more research I did and read about people who have made their own for years, the less of a worry it became.

Last night I decided to go for it. I am so glad I did!  I may never buy store bought yogurt again.  Not only was it tasty, but it was relatively easy.

I used ideas from many different recipes that I found on Pinterest. You can click on the word Pinterest in the previous sentence to see some I looked at.  I knew I wanted to try the crockpot method, so mostly that is what I looked up.

Some recipes rely on timing and senses. I wanted to rely on temperature to be extra safe.

Here are the materials you will need:


  • 1/2 gallon whole milk
  • 1/2 c powdered milk
  • Cooking thermometer
  • Crockpot
  • 1/2 c store bought plain yogurt w/ live active cultures
  • Something for stirring
  • Large Towel


Here's what I did:


  1. Pour milk into the crockpot
  2. Add dry milk and give it a stir
  3. Leave on until milk temperature reaches 180 degrees (about 1.5h on high, but could vary widely depending on your crockpot, so please use a thermometer
  4. When that temperature is achieved, turn off the crockpot. Remove the pan part from the heating element and take the lid off.
  5. Give a stir to mix throughout. 
  6. Let the mixture decline in temp to 115 degrees (no worries if it gets as low as 100). Stir occasionally.
  7. When this temperature is achieved, take out a cup or so (no need to actually measure) of the milk and pour into a small bowl with the store bought yogurt (Make sure it has live, active cultures- the carton will say it on it!).  Mix together and pour back into the crockpot.
  8. Now cover the crockpot again, wrap with large towel and place in oven without turning it on! 
  9. Let it sit there for 8-12 hrs
  10. Viola yogurt!


At this point, the yogurt should have a texture similar to the picture above.  To make a thicker yogurt (Greek style), place cheesecloth (coffee filters, paper towels, or napkins can do the trick as well) in a strainer with a bowl underneath.  You are filtering out the whey. Many people use the whey in place of water or milk in baked goods as it is very good for you.


There you have it!

Spoon this into small Rubbermaid type containers, mason jars, or what you have handy.  Be sure to take out 1/2 a cup to use as your starter for your next batch!

Flavor as you like.  Right now I am eating mine with fresh pineapple and a honey drizzle- YUM!

Tuesday, April 1, 2014

Homemade Ginger Ale Is So Cheap, Easy, and Amazingly Delicious


I have always been a ginger ale fan.  What I didn't know, is there was very little ginger in any of the store bought ones.

Being a crafter (not a fantastic one) and a Do it yourself-er, I looked for recipes online. I was amazed by how many there are! I tried a few and decided to take components of a few, plus my own added touches to "create" my own. First you will make a syrup.

Now, I do not follow a strict recipe; I rarely do! But here is a really good idea of what I do:

Ingredients:


  • 1 cup chopped fresh ginger
  • 4 cups Water
  • 1/2 Cup lemon juice
  • 2 cups sugar ( for this I mix regular with brown sugar equally) You could use date sugar, coconut sugar, any kind you like to your taste
  • 1/2 T  Red Crushed Pepper Flakes


Directions:


  • In a saucepan, bring to a boil all ingredients.  
  • Let boil, stirring often, for about 5 minutes.
  • Reduce heat and simmer covered for another 20-30 minutes. You really want to get all of that ginger out of the root!
  • After simmering is done, strain the mixture into jars (I love mason jars for this). It should yield about 5 cups.


This is your syrup. The next step is to mix with seltzer.  I have a Soda Stream, so I fizz up my water and fill the rest of the bottle with my syrup. And I am done!

Without the Soda Stream, you can use bottled seltzer. To make one glass, mix in a ratio of 5 parts seltzer to one part syrup.  You can customize the ratio to your liking.

Sit back and enjoy this healthy, crisp treat!